In this article, we’ll review the Chevy headlight switch wiring diagram and how to read them properly.
Chevrolet manufactures some of the best vehicles of all time. However, they’re notorious for having melted headlight switches even after just a couple of months of use.
That’s why we made this step-by-step guide on understanding headlight switch wiring diagrams. Letting you replace your Chevy’s faulty switch with ease.
By the end of this article, you’ll learn how to replace your Chevy’s headlight switch with the help of their wiring diagram.
Read on to start learning about Chevy’s headlight switch wiring diagrams.
Chevy Headlight Switch Wiring Diagram Explanation
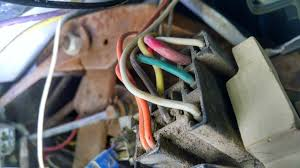
Changing your Chevy’s headlight switch can be intimidating, especially with its many wires. We’ll take you through the replacement process to show you how easy it is to understand wiring diagrams.
Headlight switch wiring diagrams illustrate the switch alongside its different terminals. The schematic also indicates the routing of the wires from your vehicle to the switch.
Here’s a sample of a Chevy’s headlight switch wiring diagram:
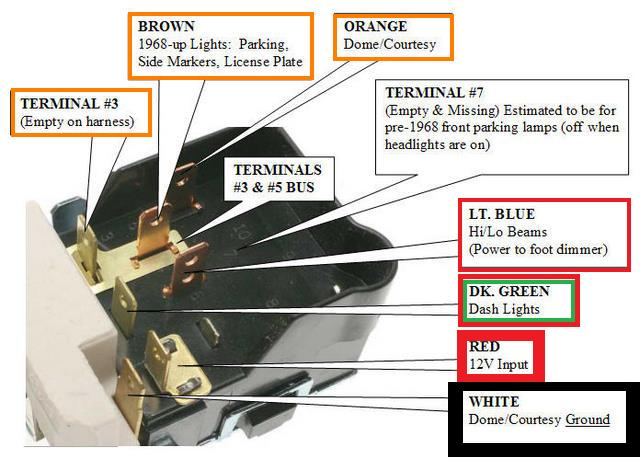
Always detach your Chevy’s battery ground terminal before proceeding with the switch replacement process.
Start by attaching the red wire to the indicated terminal on the diagram. This is the 12V input of your switch that connects to your Chevy’s battery.
Next, connect the dark green wire to its terminal. This wiring is responsible for powering up the dash lights.
After that, connect the light blue wire to its assigned terminal. This connection is the switch for your low and high-beam headlights.
You’ll then attach the orange wire to its terminal. This connection is for your Chevy’s interior bulbs, like the dome and courtesy lights.
Following that, you need to connect the brown wire to its assigned terminal. This controls your Chevy’s exterior bulbs, including side markers, license plate, and parking lights.
Last, connect the white wire to its terminal. This is your Chevy’s ground connection for the dome and courtesy lights.
Note that terminals #3 and #7 don’t have any connections. But if you own a pre-1968 Chevy, you’ll connect the front parking light wires onto terminal #7.
That’s how quick and trouble-free replacing your Chevy’s headlight switch is. Just be mindful of your wiring connections and use the appropriate wiring diagram to avoid errors.
Which Headlight Switch Wiring Diagram You Need For Your Chevy Vehicle
Even though Chevys have a similar headlight switch, there might be differences in their wiring schematic. That’s why it’s best to use the diagram specific to your vehicle’s make and model.
You can get a copy of your Chevy’s headlight switch wiring diagram from the official manufacturer’s website. Remember to indicate the exact make and model of your car for precision.
Headlight switches can also vary in their terminals’ circuitry and routing. Always use the included wiring diagram when installing it to your Chevy. You can also find more info about their schematic on their official website.
How To Test Chevy Headlight Switch Wiring
It’s essential to test your Chevy’s newly installed headlight switch for any flaws before taking it out for a ride. There are a couple of ways to do this.
One is by testing the switch’s circuitry with a multimeter measuring Ohms. This lets you see the continuity through all of its terminals. Ensuring your vehicle’s lights receive the right amount of electricity.
You can also test the new switch by turning on your headlights and park lights. They shouldn’t be dimming or flickering when activated. If you encounter this issue, check for loose or mismatched wiring connections.
If your new switch failed any of these tests even after troubleshooting, it might be faulty. It’s best to get a better replacement to ensure your driving safety.
That’s how easy it is to replace your headlight switch. Remember to use the wiring diagram specific to your Chevy’s make and model to avoid ruining your system.