
This guide delves into Chevy truck headlight switch wiring diagrams and how to correctly interpret them.
It’s bothersome how headlight switches on Chevy trucks melt quickly. You’ll be needing a replacement switch in just a year of use.
Good thing we’ve created this guide to help you understand the headlight switch wiring diagram of Chevy trucks.
We’ll take you through the step-by-step process on reading and testing any Chevy truck’s headlight switch wiring diagram.
Read on to learn about the Chevy truck’s headlight switch wiring diagram.
Chevy Truck Headlight Switch Wire Explanation
Replacing your Chevy truck’s headlight switch may seem daunting, especially with its unique wiring diagram. But we’ll take you through it step-by-step so you’d see how easy it is to replace your truck’s switch.
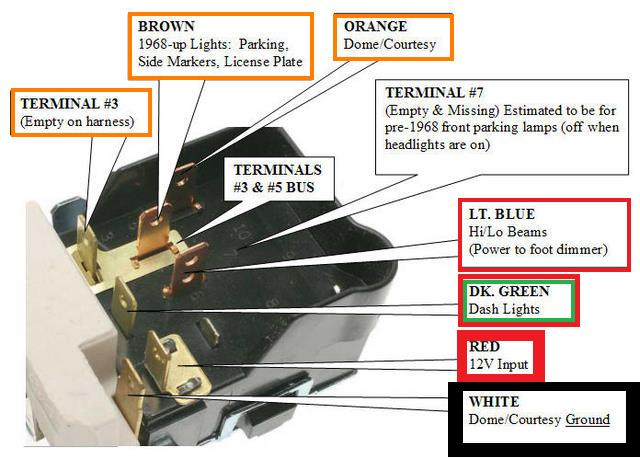
Here’s a Chevy truck’s headlight switch wiring diagram:
Remember to disconnect your truck’s battery ground terminal before starting with the headlight switch replacement.
Start your switch installation by connecting the red wire to the terminal indicated in the diagram. This is the connection for the 12V input that powers the entire switch.
Then, connect the light blue wire to its terminal. This connection lets you control your Chevy’s high and low-beam headlights.
Next, connect the dark green wire to its terminal. This powers up your truck’s dash lights.
After, you have to connect the brown wire to its assigned terminal. This connection is set to turn on your truck’s exterior bulbs, such as side markers, parking, and license plate lights.
Following that, connect the orange wire to its terminal. This lets you control some of your truck’s interior bulbs, like the dome and courtesy lights.
Finally, make sure to connect the white wire to its terminal. This is the ground for your Chevy truck’s dome and courtesy lights.
Terminals #3 and #7 don’t have any wires assigned to them unless you have a Chevy truck that pre-dates 1968. It’s assumed that terminal #7 was used as the old connection of the front parking lights.
That’s the whole process of replacing your Chevy truck’s headlight switch. Ensure you connect the correct wires to their assigned terminals to avoid errors. Always double-check your wiring diagram while doing the installation.
Which Headlight Switch Wiring Diagram You Need For Your Chevrolet Truck
Even if headlight switch wiring diagrams for Chevy trucks are similar, they still have slight nuances depending on their make and model. That’s why it’s best to look for the correct wiring schematic before replacing it.
We recommend looking for your truck’s headlight switch wiring diagram on the official Chevrolet website. Make sure to indicate your vehicle’s exact model to avoid confusion.
Headlight switches may also vary depending on their manufacturer’s design. Always use the included wiring diagram as your reference when installing it onto your truck. You can also find the switch’s schematic on the brand’s official website.
How To Test A Chevy Truck Headlight Switch
It’s essential to test your Chevy truck’s brand-new headlight switch upon installation to ensure optimal functionality.
The best way to test your truck’s switch out is by turning on your headlights and park lights. This lets you know if its circuit isn’t functioning correctly.
To do this test, turn on your headlights or park lights. If they turn on without dimming, your switch works fine. Otherwise, you should inspect the switch for any loose or mismatched connections before trying again.
You should test the switch’s circuit for continuity if fixing the connections doesn’t solve the problem. You can do this with a multimeter that measures Ohms.
You should test the switch’s terminals for a consistent flow of electricity. This ensures that its circuit can properly power your truck’s lights.
That’s how simple it is to understand your Chevy truck’s headlight switch wiring diagram. Remember to follow the correct schematic for your vehicle’s model before doing any replacements.