In this guide we take a look at Ford headlight’s switch wiring diagram and how to properly interpret it.
Ford vehicles are notorious for melted headlight switches, and their wiring diagrams can be challenging to read.
Giving you a headache when it’s time to replace them.
So, we wrote this guide on understanding Ford headlight switch wiring diagrams.
After this article, you’ll learn how to install and test Ford-style headlight switches with wiring diagrams properly.
Read on to learn about Ford headlight switch wiring diagrams.
Ford Headlight Switch Wire Explanation
Ford-style headlight switches have a unique wiring connection you won’t find in other vehicles. That’s why reading their diagrams can get a bit intimidating. But once you understand their schematics, switch replacements will be like walking in the park.
Ford’s headlight switch wire is mounted on a lever close to the steering column. You might also find it in a button or knob format inside the car’s interior.
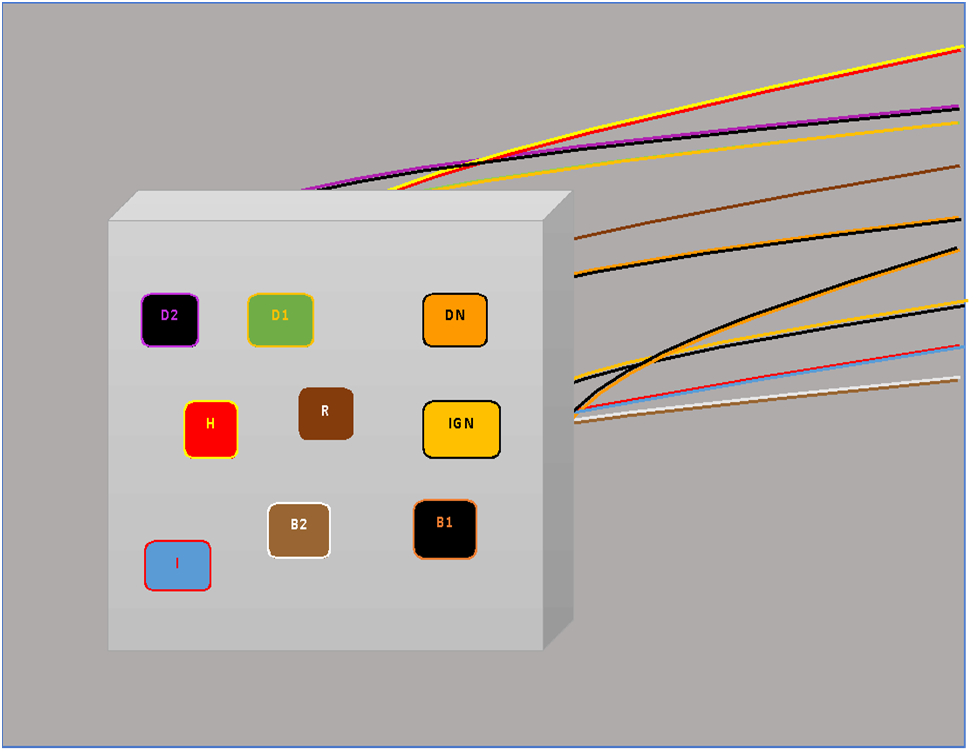
Here’s a sample of a Ford-style headlight switch wiring diagram:
You must disconnect your car’s battery ground terminal before proceeding to the headlight switch replacement.
- Connect the black wire with an orange stripe to the B1 pin. This terminal is for the battery.
- Connect the light brown wire with a white stripe to the B2 pin. This terminal is also a connection for the battery.
- Connect the green wire with a yellow stripe to the D1 pin. This terminal relays positive power to the interior lights.
- Connect the black wire with a violet stripe to the D2 pin. This terminal operates all of the interior lights.
- Connect the red wire with a yellow stripe to the H pin. This terminal operates the headlight dimmer switch.
- Connect the blue wire with a red stripe to the I pin. This terminal operates the instrument panel lights.
- Connect the yellow wire with a black stripe to the IGN pin. This terminal is for the positive battery.
- Connect the brown wire to the R pin. This terminal is for the exterior lights.
- Finally, connect the orange wire with a black stripe to the DN pin. This terminal is for the radio illumination lights.
That’s all you need to replace your Ford vehicle’s headlight switch. Ensure that you connect the correct wires to their respective terminals to avoid damaging your system. If you run into any hiccups, always refer to your wiring diagram.
Which Headlight Switch Wiring Diagram You Need For Your Ford Vehicle
Even though Ford’s headlight switch wirings are relatively similar, they still have nuances depending on the vehicle’s make and model. This is why checking your car’s wiring diagram before installation is important.
You can easily find your vehicle’s wiring diagram at Ford’s official website. Just look for the correct schematics for your car’s make and model.
Each headlight switch replacement may also have a unique wiring diagram. Their schematic is usually found with the included instruction manual. If not, you can try looking through the manufacturer’s official website.
How To Test Ford Headlight Switch Wiring
It’s essential to test your Ford vehicle’s newly installed switch to ensure its functionality. You wouldn’t want any mishaps with your lights while on a long road trip.
You can start by testing your Ford vehicle’s headlights and park lights. This is an excellent way to know if you have a faulty switch. To do this, you should try jumpering the different terminals of your switch.
Test your headlights by jumpering terminals B1 and H. If they turn on, you know your switch is working correctly. Otherwise, the switch might be faulty.
You may do this same process for your park lights by jumpering terminals B2 and R. This is the quickest way to know if your Ford’s switch isn’t working correctly.
You should also test your replacement switch’s continuity with the help of a multimeter that measures Ohms. This lets you know if the circuit has a consistent flow of electricity that properly powers your vehicle’s lights.
That wraps up the explanation of the Ford headlight switch wiring diagram. Always remember to use your vehicle’s wiring schematic when replacing a switch to avoid complications.