In this article, we’ll review the Halo headlight wiring diagram and how to interpret it properly.
Traditional car headlights aren’t aesthetically pleasing, especially on newer car models. That’s why more drivers are transitioning to Halo headlights.
The question is: how do you install them?
Don’t worry. We made this step-by-step guide to help you understand the Halo headlight wiring diagram. Letting you replace your car’s out-of-date stock headlights.
At the end of this article, you’ll learn how to read and choose the correct Halo headlight wiring diagram for a smoother installation process.
Read on to start learning about the Halo headlight wiring diagram.
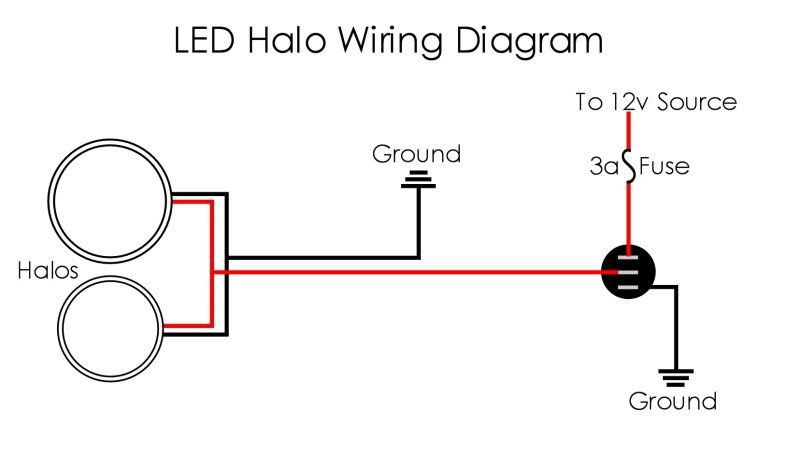
Halo Headlight Wiring Diagram Explanation
Halo headlights have a unique design that makes them seem annoying to install. But they’re pretty easy to attach to your car once you understand their wiring diagram.
Here’s a sample Halo headlight wiring diagram:
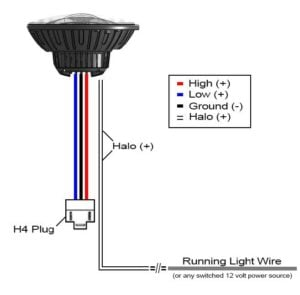
The sample diagram illustrates the Halo headlight alongside its different connections. Each wire is also labeled as follows:
- Red Wire – High-Beam Light
- Blue Wire – Low-Beam Light
- Black Wire – Ground Connection
- White Wire – Halo Daytime Running Light
Once your Halo headlight is ready, you can proceed with the installation.
Always disconnect your car’s battery before installing your Halo headlight upgrade.
Start the connection by detaching your original headlight assembly. It’s best to review your vehicle’s assembly diagram to do this.
Next, replace the stock bulbs with your brand-new Halo headlights. Make sure to connect the wire to the corresponding plug of your vehicle. Again, it’s best to use your car’s diagram as a reference while doing this.
You’ll then connect the white wire to your vehicle’s accessory power terminal or any 12V battery source. If your car doesn’t have one available, affix it to your brand-new headlight’s blue wire. This activates the Halo Daytime Running Light.
Reattach the headlight assembly to your car to finish the installation. It was that quick!
Keep in mind that not all Halo headlights have the same process. But they’re all relatively similar. You should also remember to get the wiring diagram specific to your car’s make and model to aid you in replacement.
Where You Can Find The Correct Halo Headlight Wiring Diagram
Not all Halo headlights are compatible with every vehicle. That’s why it’s essential to have a copy of your car’s headlight wiring diagram to know which upgrade is compatible.
You can quickly grab a copy of your car’s headlight wiring diagram from the manufacturer’s official website. Indicate your vehicle’s make and model to get the precise schematics for the installation procedure.
It’s best to look for Halo headlights that fit your car’s headlight assembly. Many aftermarket manufacturers have their replacements’ schematics available on their official websites. Letting you compare their wiring diagram from your vehicle’s to ensure a perfect match.
How To Test Halo Headlight Wiring
You should first test your upgraded Halo headlights before taking them out for a drive. Ensuring you that they’re functioning as they should. There are a couple of ways to do this.
One is by simply turning on your new headlights. You’re good to go if they turn on without dimming or flickering. If not, check for loose or mismatched connections in your car’s headlight switch. Ensure that each wire is inserted into its respective terminals.
You can also test your car’s headlight switch circuit with a multimeter measuring Ohms. This ensures all terminals have continuous electricity, effectively powering up your newly installed Halo headlights.
Now that you’ve learned how to install a Halo headlight, upgrade your car! Always remember to have a copy of your vehicle’s headlight assembly diagram to assist you in the replacement process.