In this article, we’ll review the headlight dimmer switch wiring diagram and how to read it correctly.
In your car’s lifespan, you’ll need to replace the headlight dimmer switch more often than you think. That’s why it’s essential to know how to read its wiring diagram.
That’s why we wrote this step-by-step guide on reading a headlight dimmer switch’s wiring diagram.
You’ll learn how to understand and choose the precise wiring diagram for your vehicle. Letting you replace your headlight dimmer switch seamlessly.
Keep reading to start learning about the headlight dimmer switch wiring diagram.
Headlight Dimmer Switch Wiring Diagram Explanation
Replacing your headlight dimmer switch can be daunting, especially if it’s your first time seeing their wiring diagram. But it’s pretty easy to understand once you’ve learned the basics.
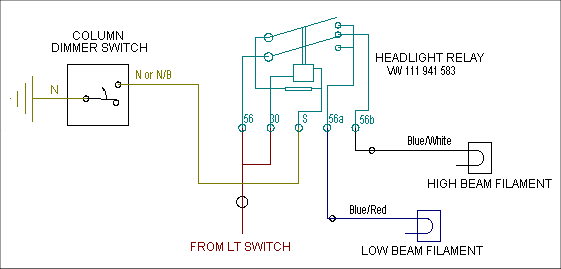
Here’s a sample headlight dimmer switch wiring diagram:
The wiring diagram illustrates the headlight dimmer switch alongside the wiring assignments of each terminal.
Once your headlight dimmer switch is ready, you can proceed with the installation.
Always disconnect your car’s battery ground terminal before starting the replacement.
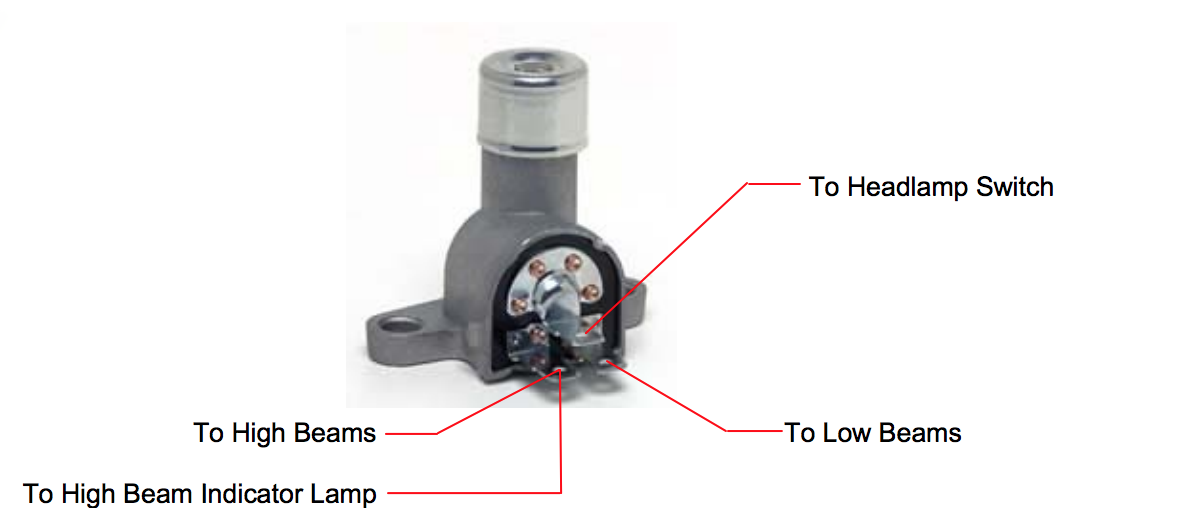
You must first wire the dimmer switch to your car’s existing headlight switch. This connection lets you control your high and low-beam headlights while driving.
Next, connect the wire of your low-beam bulbs to the dimmer switch’s indicated terminal.
Finally, connect the wires of your high-beam bulbs and high-beam indicator lamp to their assigned terminal. And you’re done!
Installing the headlight dimmer switch is pretty straightforward compared to other part replacements. Make sure you use its wiring diagram as a guide throughout the process to avoid any hurdles.
Where You Can Find The Correct Headlight Dimmer Switch Wiring Diagram
Not all cars have the same headlight dimmer switch wiring diagram. That’s why using the schematics specific to your vehicle’s make and model is crucial.
You can quickly obtain a copy of your car’s headlight dimmer switch wiring diagram from the manufacturer’s official website. Don’t forget to indicate the make and model of your vehicle to avoid installation issues.
It’s also essential to compare your replacement switch’s schematics to your vehicle’s. That’s why most aftermarket manufacturers have wiring diagrams on their official websites. Letting you match the upgrade that’s most compatible with your car.
Why Use A Headlight Dimmer Switch
A headlight dimmer switch is a convenient way of controlling your car’s low and high-beam bulbs. You can quickly use it when you need brighter light while driving, just like entering a tunnel or going through a street with dimly lit street lamps. Ensuring you have a safer everyday drive.
You can even use the dimmer switch to signal other drivers on a highway. An example is by flickering your headlight. This is an easy way to prompt other drivers to go ahead of you while in an intersection.
Go ahead and upgrade your car’s headlight dimmer switch! Always remember to use the appropriate wiring diagram to avoid mishaps when doing the replacement.