In this article, we’ll review the headlight socket wiring diagram and how to read them properly.
The headlight sockets will melt at some point in your car’s life. Leaving you with flickering and dimming lights that can lead to accidents while on the road.
That’s why we made this step-by-step guide on reading headlight socket wiring diagrams so you can do the replacements yourself.
By the end of this article, you’ll learn how to understand and choose the correct headlight socket wiring diagram to aid you in installations.
Keep reading to start learning about headlight socket wiring diagrams.
What Is A Headlight Socket Wiring Diagram?
Headlight sockets are crucial to your car’s functionality. And replacing them can be daunting, especially if it’s your first time doing so. But once you get the hang of reading their wiring diagrams, the installation process becomes effortless.
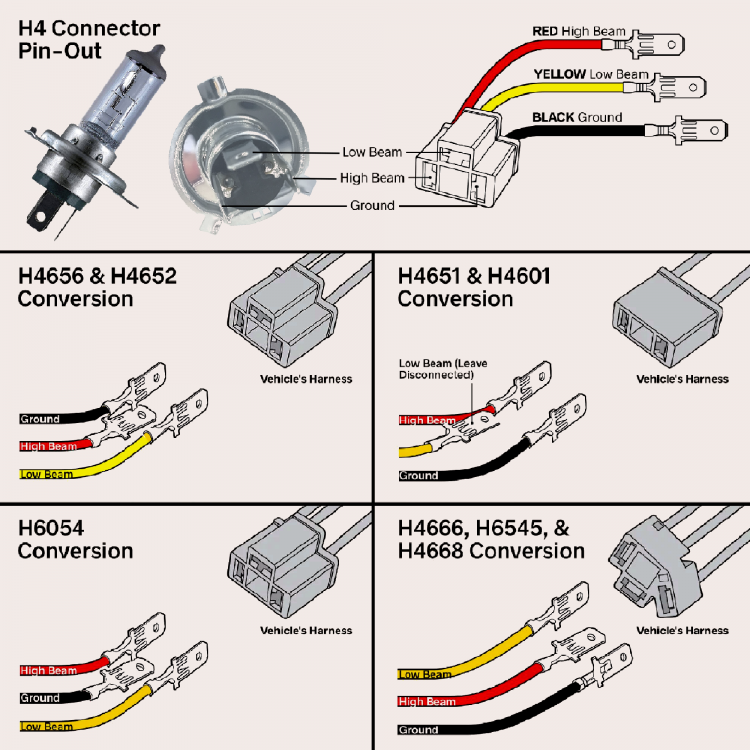
The headlight socket is a female connector responsible for powering your car’s headlights. Each socket has various terminals with different wiring assignments for ground, low-beam, and high-beam bulbs.
Keep in mind that you’ll also find sockets with terminals assigned to the car’s other bulbs. These usually include the park and daytime running lights.
Here’s a sample of a simple headlight socket wiring diagram:

https://www.erareplicas.com/427man/wiring/hdltsocket.gif
The wiring diagram illustrates a headlight socket alongside its various pin terminals. Each terminal is labeled with its corresponding wire assignment.
For this diagram example, you only need to worry about the white, red, and black wires. All you have to do is connect each wire to its respective terminals to power them.
That’s how quick it is to read and understand headlight socket wiring diagrams!
What Type Of Headlight Socket Wiring Diagram Do You Need And Where Can You Find It?
Even though all headlight sockets work similarly, not all have the same wiring diagram. Using an incompatible socket with your car may cause a ton of issues, rendering them unusable. That’s why it’s essential to get the schematics specific to your socket and vehicle model.
You should grab a copy of your car’s headlight socket wiring diagram to ensure compatibility with the replacement. Informing you of the specific socket model you’ll need to complete the upgrade.
Your car’s schematics are always readily available on the manufacturer’s official website. Just remember to indicate your vehicle’s make and model to avoid any complications.
Aftermarket and first-party headlight socket replacements also arrive with their wiring diagram. These are usually inside their instruction manuals.
You can also obtain copies of their schematics from their manufacturer’s official websites. Letting you compare their compatibility with your vehicle’s requirements.
How To Use A Headlight Socket Wiring Diagram?
Now that you’ve learned the basics of a headlight socket’s wiring diagram, we’ll take you through reading them correctly.
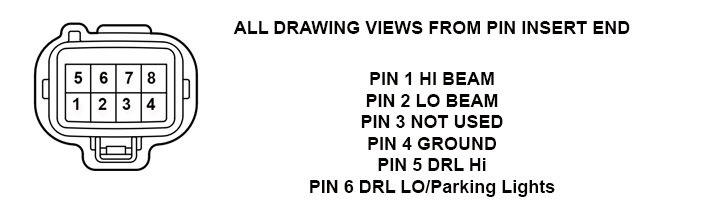
As mentioned earlier, some headlight socket models have terminals assigned to the car’s other bulbs. The Honda Civic utilizes a socket with connections for the parking, high, and low daytime running lights.
To further understand what we mean, here’s a sample headlight socket wiring diagram for a Honda Civic:
https://www.civicx.com/forum/attachments/4d546ab8-ecc3-4377-9a09-75d1ef72eb9b-jpeg.298145
The wiring diagram indicates eight terminals of the Civic’s headlight socket. Each terminal is numbered with its respective wiring designation.
Always unplug your car’s battery ground terminal before starting the installation.
Start by attaching your car’s high-beam wire to terminal #1. Then, connect the low-beam wire to terminal #2. You don’t have to attach any wire to terminal #3.
Next, connect your headlights’ ground wire to terminal #4. You’ll then attach the high daytime running light wire to terminal #5.
Finally, attach your car’s low daytime running light wire to terminal #6. If your vehicle has parking lights, you can opt to connect that wire to terminal #6 instead.
And you’re done! Don’t get intimidated by the socket’s many terminals. It’s best to just refer to the wiring diagram if you encounter any hurdles during installation.
That’s how easy it is to read and understand headlight socket wiring diagrams. Remember to use the correct schematics assigned to your vehicle to guide you in choosing the best socket replacement.