In this article, we’ll review the Mazda 6 headlight assembly diagram and how to read them properly.
All Mazda 6 owners dread the day their headlamps go bad, requiring assembly replacements.
This task can be intimidating if it’s your first time changing your headlights.
That’s why we made this step-by-step guide on reading and understanding the Mazda 6’s headlight assembly diagram.
By the end of this article, you’ll learn to read and choose the correct Mazda 6 wiring diagram. Letting you replace your headlight assembly seamlessly.
Read on to start learning about Mazda 6’s headlight assembly diagrams.
Mazda 6 Headlight Assembly Diagram Explanation
Reading your Mazda 6’s headlight assembly diagram may seem confusing at first. Especially with its many components. But it’s pretty easy to understand once you learn the schematics.
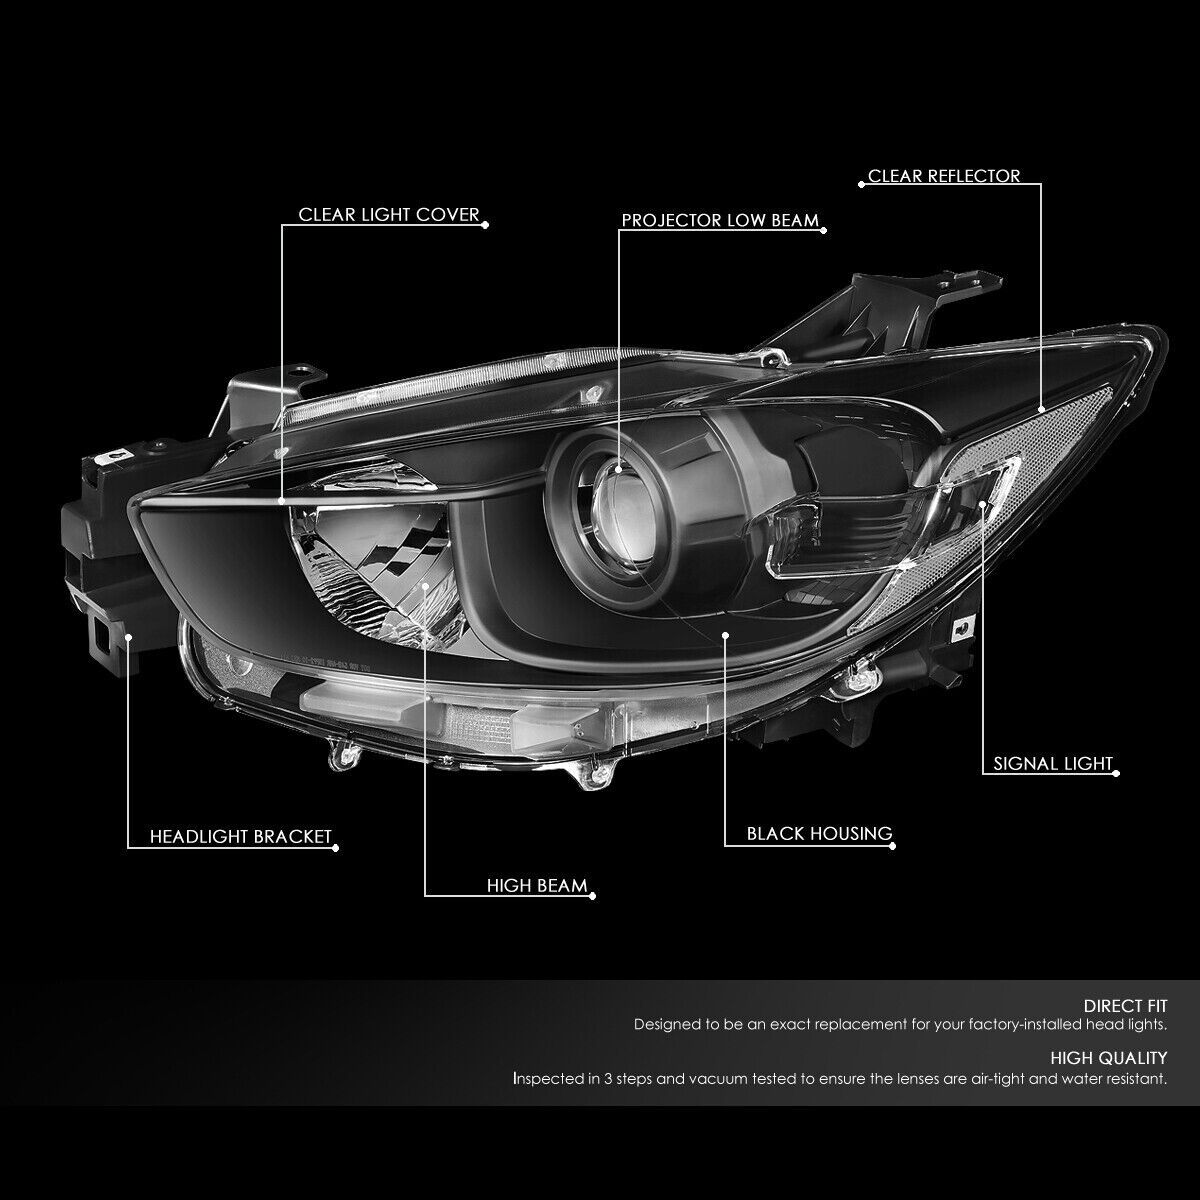
Here’s a sample of a Mazda 6 headlight assembly diagram:
The diagram shows an illustration of your Mazda 6’s headlight assembly and all of its different components. Each part is also numbered.
Here are the names of each numbered component:
- Composite Headlamp
- Retaining Bracket Retainer Screw
- Headlamp Assembly U-Nut
- Headlamp Assembly Rivet
- Low-Beam Bulb
- Low-Beam Bulb Cover
- High-Beam Bulb
- High-Beam Bulb Cover
- Park Lamp Bulb
- Socket and Wire
Once your brand-new headlight assembly is prepared, you can proceed with the installation.
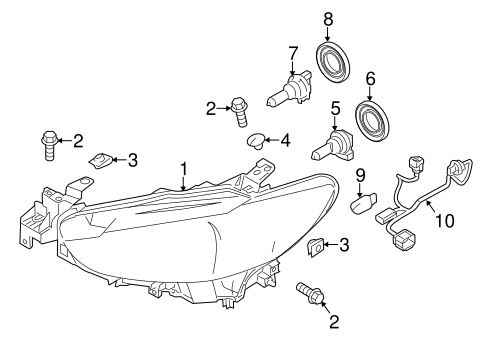
Here’s an instructional diagram for the headlight assembly replacement:

Always disconnect the negative battery cable before starting the installation.
Start by removing your Mazda 6’s front bumper. This lets you access the entire headlight assembly. Making the replacement hassle-free.
To remove the stock headlight assembly, you must first disconnect its connector indicated as #1 in the diagram.
Next, unscrew all the bolts marked as #2 in the diagram.
Once you’ve removed the bolts, you should detach the fastener indicated as #3 in the diagram.
Afterward, you’ll need to remove the cover indicated as #4 in the diagram.
Finally, you can detach the headlight assembly marked as #5 in the diagram.
To install your Mazda 6’s brand-new headlight assembly, you’ll just reverse the steps of removal.
Once you’ve attached the headlight assembly replacement, make sure to adjust the aiming angle of your bulbs. And you’re done!
The headlight assembly installation process is straightforward, even with its front bumper removal. Remember to use the diagram as a guide if you face any hurdles while doing the replacement.
Where You Can Find The Correct Mazda 6 Headlight Assembly Diagram
Not all Mazda 6 models have the same headlight assembly diagram. Each has a unique build, making it crucial for you to get the correct schematic when doing the replacement.
Good thing you can quickly grab a copy of your Mazda 6’s headlight assembly diagram from their official website. It’s important to note the year and make of your car to avoid complications during installation.
It’s also best to compare your Mazda 6’s diagram to the headlight assembly substitute to ensure a perfect match. Most aftermarket manufacturers have their assembly schematics available on their official websites.
How To Test Mazda 6 Headlight Switch Wiring
You should test your Mazda 6’s brand new headlights before taking them out on a trip. There are a couple of methods to do this.
One test is by simply turning on your headlights. If they power on without dimming or flickering, you’re all set. Otherwise, you should check the switch for any loose connections. Ensure that their wires are correctly seated onto the terminals.
You can also check the headlight switch’s continuity with a multimeter measuring Ohms. This lets you know if the circuits provide enough power for your Mazda 6’s lights.
Now you’re ready to replace your Mazda 6’s headlight assembly! Always use the correct wiring diagram specific to your vehicle’s model to avoid complications.