In this article, we’ll review the Prius headlight diagram and how to read them properly.
The Toyota Prius is a beautiful car except for its super brittle headlamps. Making headlight assembly replacements inevitable if you’re an owner.
Good thing we made this step-by-step guide to help you understand the Prius’ headlight diagram.
You’ll learn how to read and choose the appropriate wiring diagram. Letting you replace your Prius’ headlight assembly with ease.
Read on to start learning about Prius headlight diagrams.
Prius Headlight Assembly Diagram Explanation
Reading your Toyota Prius’ headlight assembly diagram may look confusing at first. But it’s pretty straightforward once you understand all of its components.
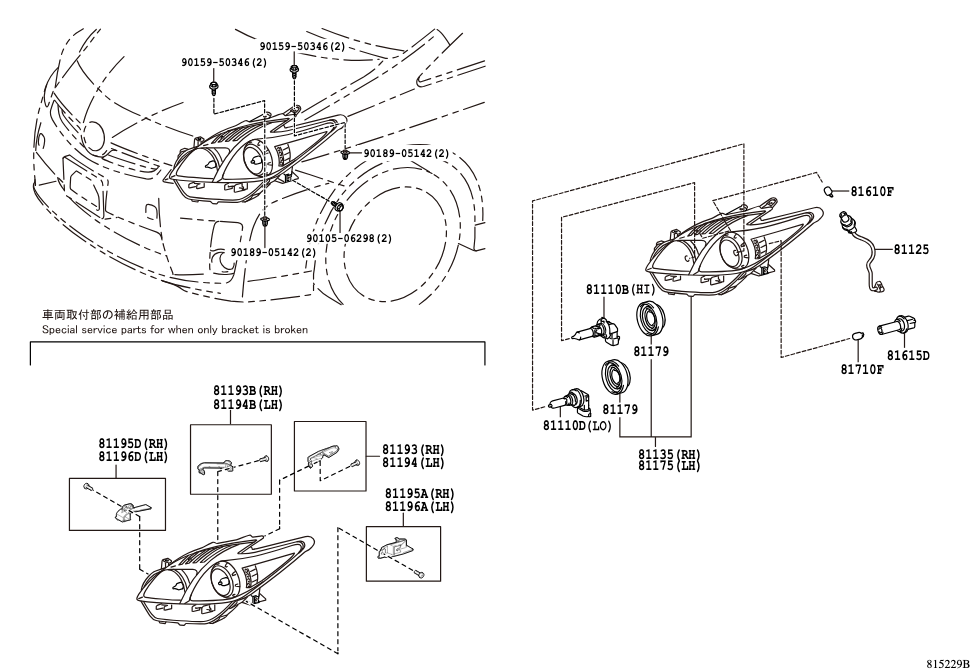
Here’s a sample of a Prius headlight assembly diagram:
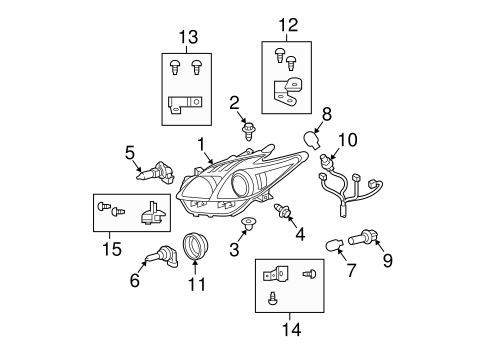
The Prius’ assembly diagram illustrates its headlights and many components. Each part is also numbered.
Here are the labels for each component. Use their numbers as a guide:
- Composite Assembly
- Headlight Assembly Screw
- Headlight Assembly Grommet
- Headlight Assembly Lower Bolt
- High-Beam Bulb
- Low-Beam Bulb
- Signal Light Bulb
- Marker Light Bulb
- Socket Plug
- Wire Harness
- Cover
- Upper Inner Repair Bracket
- Upper Outer Repair Bracket
- Lower Inner Repair Bracket
- Lower Outer Repair Bracket
When your new headlight assembly is prepared, you can install it into your Toyota Prius.
Ensure you’ve unplugged your Prius’ battery ground terminal before starting the installation.
You must remove your Prius’ front bumper to access the entire assembly. Then, you’ll unscrew your stock headlight’s screws before detaching its wires from the switch. Ensure that you retain where each screw fits to avoid issues during the replacement.
Afterward, you can install your replacement headlight assembly into your Prius. First, connect the wires to your car’s switch. Then, reattach all the screws securely to their respective holes. Ensure that your brand-new upgrades don’t have a loose fit.
Finish the installation by reattaching your front bumper. And you’re done!
Removing your car’s front bumper for the first time can be daunting. But once you get past that, the whole process is seamless. Always remember to follow the steps in your diagram to avoid installation errors.
Where You Can Find The Correct Prius Headlight Assembly Diagram
Even though Toyota Prius models look similar, they have nuances with their headlight assemblies. That’s why it’s crucial to have the wiring diagram specific to your car’s make and version.
You can grab a copy of your Prius’ headlight assembly diagram from Toyota’s official website. Don’t forget to indicate your vehicle’s year and model for precise replacement specifications.
It’s also crucial to compare your Prius’ assembly diagram to aftermarket replacements to ensure perfect compatibility. Replacement headlight assembly diagrams are available on their manufacturers’ official websites.
How To Test Prius Headlight Switch Wiring
Don’t forget to test your Prius’ brand-new headlight assembly before taking them out for a trip. Here are a few ways to do so.
A simple way to test them is by turning on the headlights. If they’re dimming or flickering while powered on, you should check for any loose wirings to the switch. But if they’re bright and consistent, you’re good to go.
You can also test your headlight switch’s circuit with the help of a multimeter measuring Ohms. This inspects the electrical continuity of your Prius’ switch. Ensuring all the lights in your car are powered correctly.
You’re now set to replace your Toyota Prius’ headlight assembly. Remember that your diagram should match your car’s model for a flawless installation process.