In this article, we’ll review simple headlight wiring diagrams and how to properly interpret them.
Replacing your vehicle’s headlights is a daunting task, especially with their confusing wires that don’t make any sense at all.
Good thing we’ve written a step-by-step guide for understanding simple headlight wiring diagrams.
We’ll be taking you through the various parts of headlight wiring diagrams, their importance, and finding which schematic best suits your car.
Read on to learn more about the simple headlight wiring diagram.
Headlight Wiring Diagram FAQs
1. Simple Headlight Wiring Diagram Explained
Headlight wiring diagrams may look confusing at first with their different symbols. But they’re easy to grasp once you know what each one stands for.
Keep in mind that diagrams of different manufacturers will have their own legend. This will show you various symbols used in the schematic alongside matching descriptions. It’s good to be familiar with their legend to understand the wiring diagram quickly.
Each manufacturer’s symbols may have a slightly varied design. But for the most part, they are universal.
Legends can also include the following information:
- Component abbreviations
- Module codes
- System group codes
- Wiring color codes
- Additional special notes
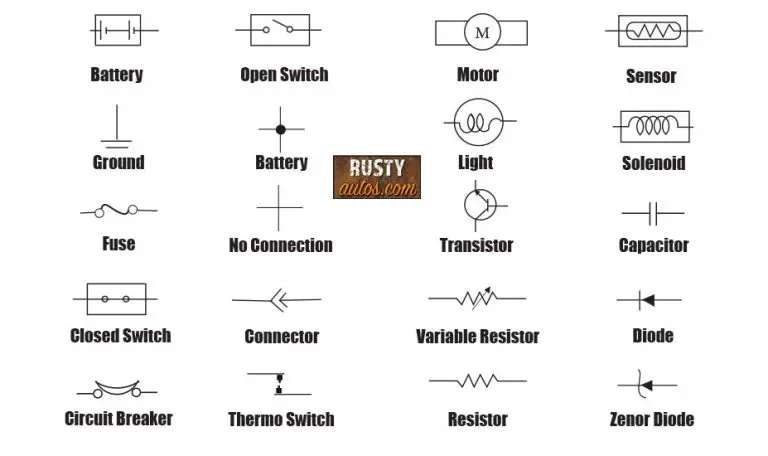
All headlight wiring diagrams will have symbols similar to the ones seen in the figure above. Some of the most common wiring diagram symbols are the fuse, open and closed switch, light, transistor, battery, and ground.
These symbols are connected by lines that represent their wiring connection. Colored lines indicate specific wire colors. Making it easier for you to know where to connect each wire.
Most aftermarket headlight upgrades will include their wiring schematic alongside their legend.
Here’s an example of a simple headlight wiring diagram:

Don’t get overwhelmed with the different symbols and connections. It’s best to follow this simple diagram’s wirings from the battery source leading to the ground. This way, the flow becomes easier to understand.
Remember to disconnect the car’s battery ground terminal before proceeding to the headlight replacement process.
The wiring diagram starts with the battery-connected fuses leading to each headlight’s switch. These switches have an automotive relay that is grounded on the chassis.
You’ll install the white high beam wire and yellow low beam wire onto each headlight’s respective connector from the switches. Afterward, you’ll have to ground each headlight onto the car’s chassis. And you’re done!
It can get confusing when there are many symbols on the diagram. Just remember to follow each wiring connection from start to finish for easier installation.
2. Why Use A Headlight Wiring Diagram
Dealing with a ton of wires and various electrical components can quickly damage your vehicle in one wrong move. Good thing wiring diagrams ensure an error-free installation process. Preventing you from ruining your car’s system and new headlights.
Each wiring diagram is a step-by-step guide that gives you the essential information on proper wire routing for your headlight upgrade. They also ensure that you have all the needed components to complete the installation.
3. Which Headlight Wiring Diagram Do You Need For Your Car
Headlight wiring diagrams are not universal, even if they look similar. Each vehicle manufacturer and headlight brand has its own schematics for installing headlights.
Getting the wiring diagram specifically for your car before starting any headlight replacements is necessary. You can find this on the vehicle manufacturer’s website.
Headlight upgrades usually come with their wiring diagram included with the installation instructions. If by any chance they’re with your purchase, it’s best to check their manufacturer’s website for the wiring schematics.
Outro
Now that you’ve understood how to read a simple headlight wiring diagram, you can proceed to upgrade your car’s headlights. Just make sure you have the correct wiring diagram to aid you in installing.
More Guides On Wiring Diagrams
- GM Headlight Switch Wiring Diagram Guide
- Dodge Headlight Switch Wiring Diagram
- Ford Headlight Switch Wiring Diagram Guide
- Chevy Truck Headlight Switch Wiring Diagram
- Universal Headlight Switch Wiring Diagram Guide
- Chevy Headlight Switch Wiring Diagram
- Jetta Headlight Diagram
- Mazda 6 Headlight Assembly Diagram
- Prius Headlight Diagram
- Ford Focus Headlight Diagram
- Headlight Dimmer Switch Wiring Diagram
- Halo Headlight Wiring Diagram